Ladybug Nail Art Tutorial Step by Step Pictures
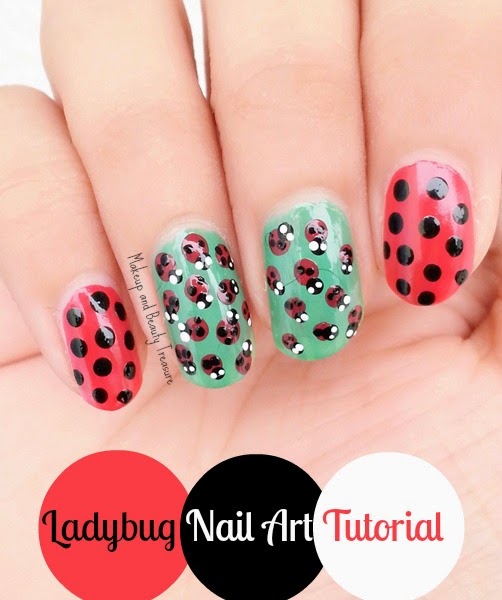
I have a huge passion for nail arts and keep trying new designs. Though I actually get scared of insects be it big or small but I love ladybugs for their bright color with pretty dots over them. I did this super easy yet chic nail art for my bestie Bushra. She has started a new lifestyle blog Bling Sparkle (Go have a look at it. It’s AWESOME!) where she has organized a nailfie contest. The prizes are really pretty and the rules are super simple. Ok before you are heading to take part in her contest, do look at my entry. I created small and cute ladybugs on my nails.
 |
| Ladybug Nail Art Tutorial with Step by Step Pictures |
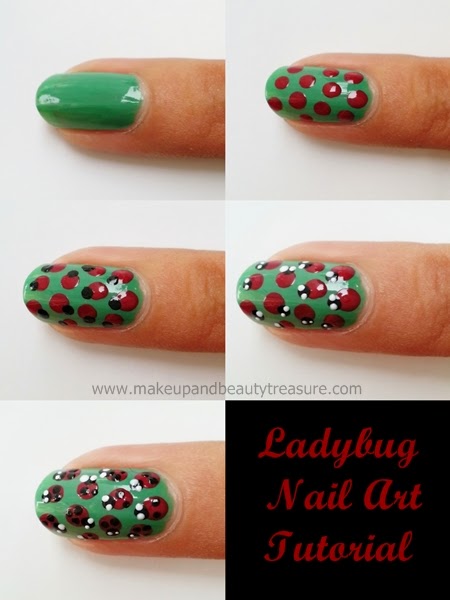
Here are step by step pictures on how to do Ladybug nail art design:
 |
| Ladybug Nail Art Tutorial with Step by Step Pictures |
• Apply a base coat of your choice. I used Lotus Color Dew Nail Enamel in Go Grapes (Read my review HERE). Let it dry completely.
• Apply big dots using the biggest nail art dotting tool #5. You can use any color- red, pink or brown. I used Elle 18 Nail Pops in shade 60.
• Using a smaller nail art dotting tool #3, apply black dots over the red dots so it depicts the head of the ladybug. I used Maybelline Color Show Nail Enamel in Blackout.
• Take the smallest nail art dotting tool #1 and apply white dots over the black dots. These are the eyes of our ladybugs. I used Faces Cosmetics Nail Enamel in White O White (Read my review HERE).
• Using the same smallest dotting tool, draw two or three small black dots over red dots to depict dots over the body of ladybugs. Let it dry completely.
• Seal your nail art with a top coat and voila our nail art is ready!
 |
| Ladybug Nail Art Tutorial with Step by Step Pictures |
 |
| Ladybug Nail Art Tutorial with Step by Step Pictures |
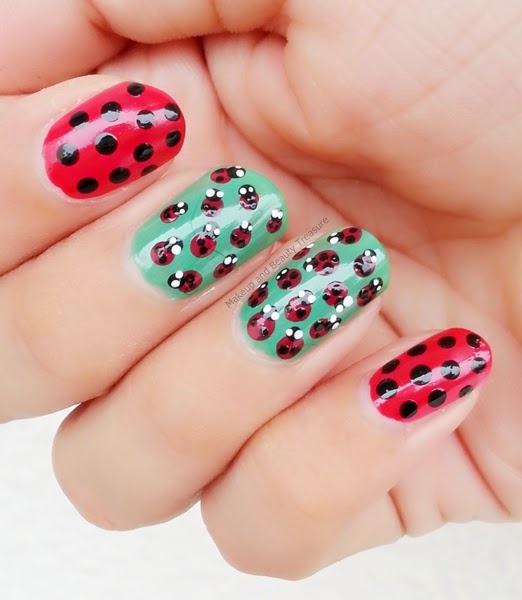
I created ladybugs on my index and middle fingers. For the rest of my nails, I painted my nails red and drew black dots over them. Ladybug nail art is super easy and looks really chic and pretty on nails.
 |
| Ladybug Nail Art Tutorial with Step by Step Pictures |
 |
| Ladybug Nail Art Tutorial with Step by Step Pictures |
You simply need nail art dotting tools to create this fabulous nail art. Ladybugs look absolutely pretty on nails and goes well with any western outfit.
Stay pretty!
Megha


very cute :*
ReplyDeleteAwww thanx sweety :*
Deletevery pretty....too good
ReplyDeleteThanx Megha!
DeleteSimply awesome swthrt <3 xx
ReplyDeleteThanx darling <3
Deletevery pretty and easy one.....looking very cute on your nails....
ReplyDeleteAwww thanx sweety <3
Deletewow! liked your nail art Megha, very clear pics dear :)
ReplyDeleteThanx so much Rakhi! :)
DeleteThis is one such professional and gorgeous nail tutorial I have seen, so beautifully done Meghu, loved it!
ReplyDeleteAwwww you made my day honey :* Thanx so much <3
DeleteSuch a pretty nail art. I would love to try it :)
ReplyDeleteThanx dear! Do try it and share with me :)
DeleteLovely nail art Meghu! ^_^ You are so good at it! :D
ReplyDeleteThanx Bushu. It is dedicated to you! :D
DeleteThis is so very cute . so many ladybugsbon a single nail.. Kudos to u.. Preettyy nail art... U have gt beautiful nails :-*
ReplyDeleteAwww thanx sweety <3
DeleteThat's one beautiful nail art i have seen in many days. Bugs on nails, a very new concept .. very cute :)
ReplyDeleteThanx so much sweety :*
DeleteI wish i had so much patience like u.. hehe.. i loved the nail art dear ;)
ReplyDeletemy bhabhi n frns tell me the same thing :D Thanx so much <3
DeleteSo cute :*
ReplyDeleteThanx sweets :*
DeleteNice Tutorial Megha :)
ReplyDeleteThanx Pearl :)
DeleteI always love your playing around with your dotting tools and coming up with so many innovative nail art ideas. This one is one of your best so far and so super duper cute <3 I love lady bugs.
ReplyDeleteAwwww thanx so much di <3 You made my day :* I feel i have not seen them in real life :)
Deleteadorable!
ReplyDeleteThanx dear :)
DeleteThis is Amazing !
ReplyDeleteVery Cute 'n' Adorable :)
Thanx sweety :)
Delete